Apple Pay
Paylands allows your business to offer Apple Pay as a payment method to securely obtain your customer's card data and process the transaction.
There are two integration modes available with Paylands: • Simple Integration (recommended for most businesses) • Advanced Integration (for mobile apps or advanced integrations)
Integration Modes
1. Simple Integration
This is the simplest and quickest option to implement.
In this mode:
- You configure the Apple Pay button on your checkout.
- Paylands manages the entire payment flow:
- Merchant validation
- Authorization request
- Payment processing and capture
It is compatible with devices and browsers that support Apple Pay (Safari on iOS and macOS).
Configuration Steps
- Access the Paylands dashboard.
- Go to Settings → Alternative Methods → Apple Pay.
- Configure the domains where the button will be displayed.
- The domain api.paylands.com is already configured by default.
- If you use the Paylands hosted checkout, you don't need to add any additional domains.
- If you want to display the button directly on your website, you must:
- Add your domain.
- Download the Apple verification file from the dashboard.
- Publish it in the path indicated by Apple on your server.
- Configure the button type and style according to your needs.
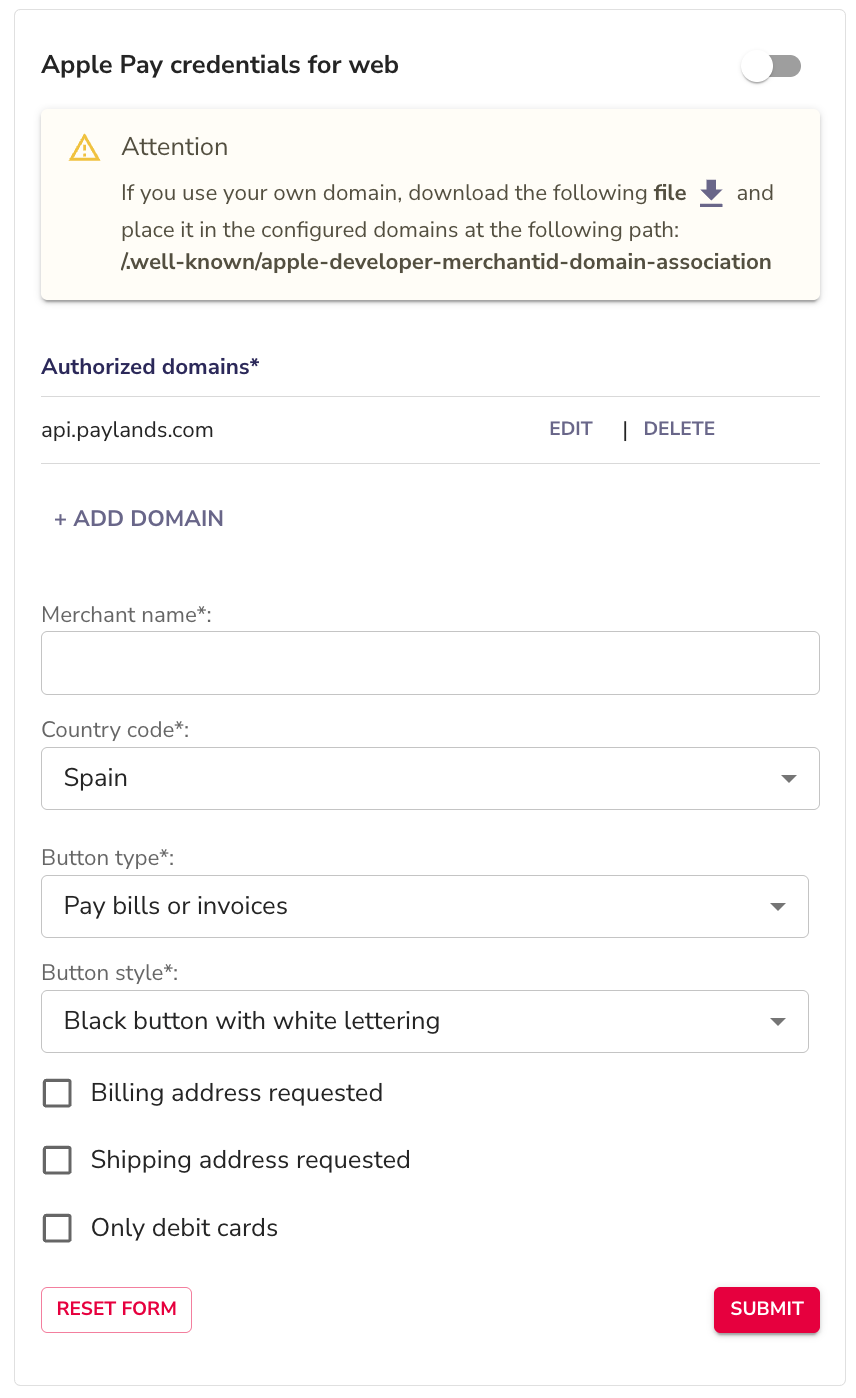
Once configured, customers will be able to pay with Apple Pay through your checkout or website.
2. Advanced Integration (or custom integration)
Designed for:
- iOS mobile applications.
- Businesses that want to have complete control over their Apple Pay integration.
⚠️ Prerequisites:
- Active account in the Apple Developer Program.
- Merchant ID configured in Apple.
- Application prepared to use Apple Pay.
Technical Flow
In this model:
- Your application requests payment authorization directly from Apple Pay.
- Apple returns an encrypted payment token.
- Your backend sends that token to Paylands.
- Paylands processes the operation and returns the transaction result.
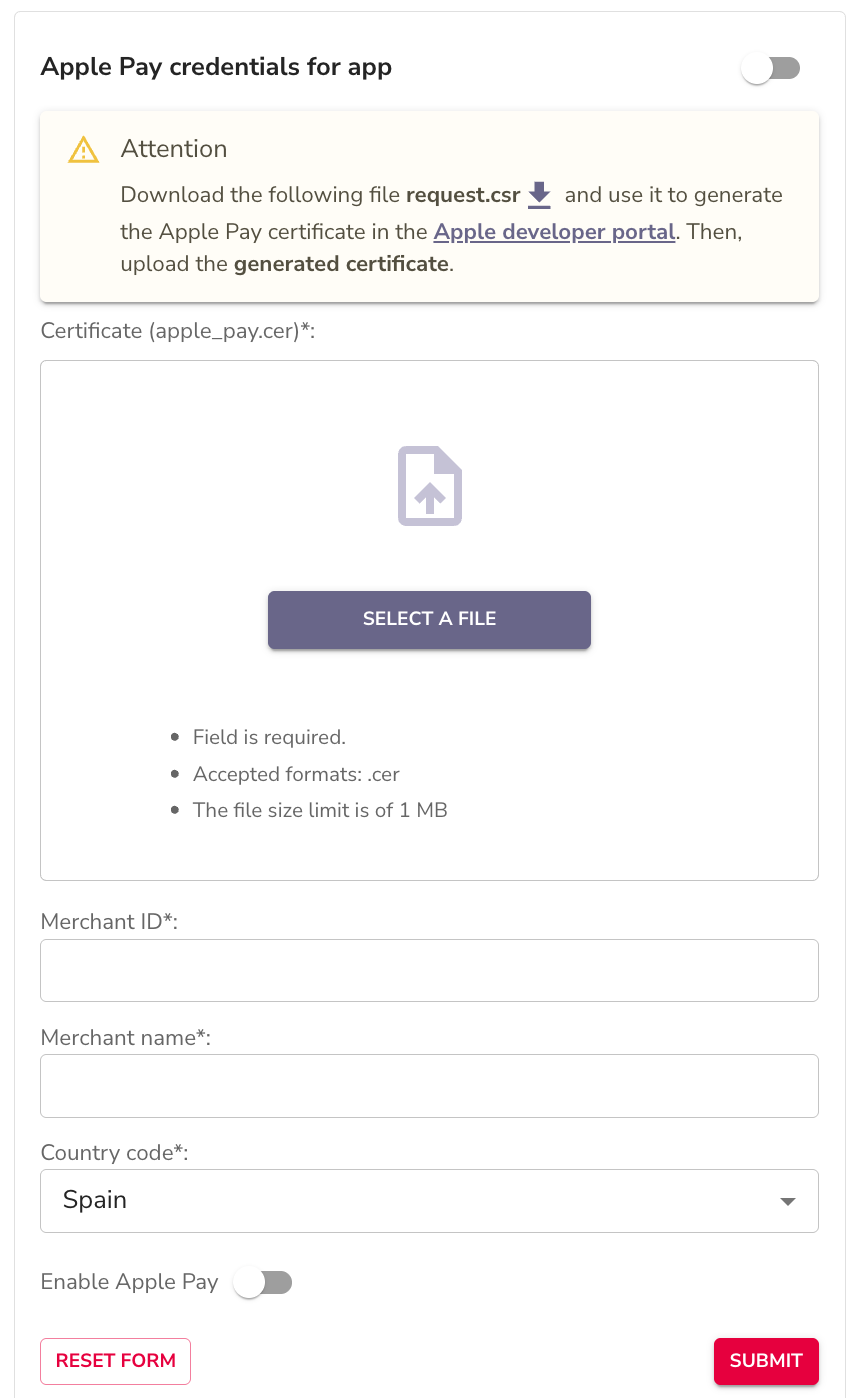
Configuration Steps
- From the Paylands dashboard:
- Go to Settings → Alternative Methods → Apple Pay.
- Download the provided CSR certificate.
- In the Apple Developer portal:
- Create an Apple Pay certificate using the downloaded CSR.
- Associate it with your Merchant ID.
- Download the certificate generated by Apple.
- Upload the certificate to the Paylands dashboard.
- Enter your Merchant ID in the configuration panel.
- Implement the logic in your app following Apple's official documentation for:
- Configuring Apple Pay capabilities.
- Managing the PKPaymentAuthorizationController.
- Sending the payment token to your backend.
Which integration should I choose?
| Case | Recommendation |
|---|---|
| Using Paylands hosted checkout | Simple Integration |
| Own website | Simple Integration |
| Native iOS app | Advanced Integration |
| Need for complete flow control | Advanced Integration |
Important Considerations
- Apple Pay will only be available on compatible devices and browsers.
- The domain must be correctly verified to display the button.
- The certificate has an expiration date and must be renewed before it expires.
- In Advanced Integration, the responsibility for requesting the token from Apple lies with the merchant's application.
Common Errors and Troubleshooting
Below are the most common problems when integrating Apple Pay with Paylands and how to solve them.
1. The Apple Pay button is not displayed
Possible Causes
- The device is not compatible with Apple Pay.
- The browser is not Safari.
- The user does not have cards configured in Apple Pay.
- The domain is not correctly verified.
How to Fix It
- Verify that the user is using Safari on iOS or macOS.
- Confirm that Apple Pay is configured on the device.
- Check that the domain is added in the Paylands dashboard.
- Confirm that the domain verification file is correctly published.
2. Domain Validation Error
Symptom
Apple does not validate the domain and merchant validation fails.
Possible Causes
- The verification file is not in the correct path.
- The domain does not match exactly (including subdomains).
- The server does not allow public access to the file.
- Invalid or untrusted SSL certificate.
How to Fix It
- Confirm that the file is accessible at:
https://<your-domain>/.well-known/apple-developer-merchantid-domain-association - Verify that the domain configured in Paylands matches exactly with the public domain.
- Check that the SSL certificate is valid and not expired.
- Validate that there are no redirects preventing verification.
3. Apple Pay Certificate Error (In-App)
Symptom
Payment processing fails after sending the token to Paylands.
Possible Causes
- The certificate uploaded to Paylands does not correspond to the configured Merchant ID.
- The certificate is expired.
- The CSR used is not the one provided by Paylands.
How to Fix It
- Regenerate the certificate from the Apple Developer portal using the CSR downloaded from the Paylands dashboard.
- Confirm that the active certificate corresponds to the correct Merchant ID.
- Check the expiration date.
4. Payment is rejected after receiving the token
Possible Causes
- Token is malformed when sending it to Paylands.
- The backend is not sending the correct field in the request.
- The amount or currency does not match what was shown in Apple Pay.
- Card issuer restrictions.
How to Fix It
- Confirm that the complete paymentData received from Apple is being sent.
- Verify that the amount sent to Paylands matches exactly what was authorized in Apple Pay.
- Review the Paylands response logs to identify the error code.
- In case of bank rejection, treat it as a standard card denial.
5. Apple Pay works in hosted checkout but not in own website
Possible Causes
- The additional domain is not registered.
- Domain validation has not been performed.
- CORS issues or server configuration problems.
How to Fix It
- Add the domain in the Paylands dashboard.
- Correctly upload the verification file.
- Confirm that the server allows HTTPS access without blockages.